Discovering a puddle around your water heater can send a jolt of panic through any homeowner. While a leak from the bottom often signals a catastrophic tank failure, a leak originating from the top can be equally concerning. It demands immediate attention, not only to prevent water damage and potential mold growth but also to ensure the safe and efficient operation of your hot water system. Understanding the common causes behind top-of-tank leaks is the first crucial step toward diagnosing the problem and implementing an effective solution. In this comprehensive guide, we’ll walk you through the primary culprits, provide a clear diagnostic process, offer step-by-step repair solutions, and outline essential preventive measures to keep your water heater running smoothly.
Understanding Why Your Water Heater Leaks from the Top
The top of your water heater is a hub of critical connections and safety components. Unlike leaks from the base, which often point to internal tank corrosion, top leaks typically stem from issues with these external parts. Identifying the precise source of the leak is key to determining whether a simple repair will suffice or if more extensive action is required. Let’s delve into the specific components that commonly cause water to escape from the upper section of your unit.
Common Culprits Behind Top Water Heater Leaks
|
Our Picks for the Best Water Heater in 2026
As an Amazon Associate I earn from qualifying purchases.
|
||
| Num | Product | Action |
|---|---|---|
| 1 | OVENTE Electric Kettle, 1.7L Fast Boiling Water Heater for Coffee or Tea, BPA Free with Water Level Gauge, Auto Shut-Off, Boil-Dry Protection, Indicator Light and Removable Filter, White KP72W |

|
| 2 | Amazon Basics Electric Stainless Steel Kettle for Tea and Coffee, BPA-Free, Fast Boiling, Auto Shut-Off, 1.7 Liter, 1500W, Black and Silver |
|
| 3 | Cosori Electric Kettle, No Plastic Contact With Water, Wide Mouth For Easy Cleaning, Auto Shut Off, 1.7L Tea Kettle & Hot Water Boiler, Water Heater & Teapot, Borosilicate Glass, Black, 1500W |
|
| 4 | Zojirushi Micom Water Boiler and Warmer (135 oz. / 4L, Silver) |
|
| 5 | Chefman Electric Kettle, 1.8L 1500W, Hot Water Boiler, Removable Lid for Easy Cleaning, Auto Shut Off, Boil-Dry Protection, Stainless Steel Filter, BPA Free, Borosilicate Glass Electric Tea Kettle |
|
| 6 | Portable Immersion Water Heater 1800W 120V, Electric Heater for Buckets, Bathtubs and Mini Pools, Submersible Design with Thermostat, Real Time Temperature Display and Dry Burn Protection |
|
| 7 | Amazon Basics Electric Kettle with Glass Carafe for Tea and Coffee, BPA-Free, Fast Boiling, Auto Shut-Off, 1 Liter, 1500W, Glass and Steel |
|
| 8 | Portable Water Heater 2000W, Pool Heater - Immersion Heater with Digital Thermometer, Upgraded Magnesium Oxide Heating for Fast Heating, for Small Pools, Bathtubs, Buckets, Tanks |
|
| 9 | Immersion Water Heater Electric, 2000W Portable Water Heater with 304 S S Guard & LCD Thermometer, Fast Heating Bucket Heater, Ideal for Small Bucket Bathtub, Small Pool, Home Camping Outdoor Use |
|
| 10 | Amazon Basics Electric Kettle with Glass Carafe for Tea and Coffee, BPA-Free, Fast Boiling, Auto Shut-Off, 1.7 Liter, 1500W, Black and Silver |
|
Several distinct points at the top of a water heater can develop leaks. Knowing what to look for can significantly narrow down your troubleshooting efforts.
Loose or Corroded Water Line Connections
The cold water inlet pipe, bringing fresh water into the tank, and the hot water outlet pipe, distributing heated water to your home, are secured with fittings at the top of the unit. Over time, these connections can loosen due to vibration, thermal expansion and contraction, or simply age. Corrosion, especially with dissimilar metals or poor water quality, can also degrade the fittings and pipes themselves, creating pathways for water to escape. This is one of the most frequent causes of top leaks.
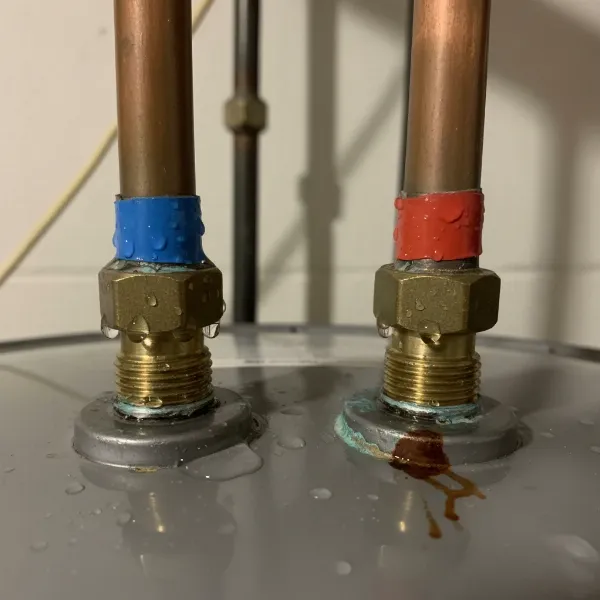 Water heater with a visible leak around the inlet and outlet pipe connections, showing water droplets and corrosion, detailed close-up shot
Temperature and Pressure (T&P) Relief Valve Issues
The T&P valve is a vital safety device designed to release water if the temperature or pressure inside the tank exceeds safe limits. It typically has a discharge pipe directed downwards. If this valve starts to leak, it could indicate several issues: the valve itself is faulty and needs replacement, there’s excessive pressure buildup in your tank (a more serious concern), or mineral deposits are preventing it from seating properly.
Leaking Anode Rod
The anode rod is a sacrificial metal rod that protects the inner lining of your water heater tank from corrosion. It’s usually screwed into the top of the tank. If the anode rod connection loosens or the sealing washer around it deteriorates, water can seep out from this port. While the rod’s primary function is internal protection, its external connection is a potential leak point.
Faulty Heating Element Gasket (Electric Models)
For electric water heaters, the heating elements are often installed through ports in the tank, sometimes at the top or side. Each element has a gasket that creates a watertight seal. Over time, these gaskets can wear out, crack, or become brittle, leading to a slow drip or steady leak around the element’s base. If you have an electric unit, this is a crucial area to inspect.
Expansion Tank Problems (If Installed)
Many water heater systems, especially newer ones or those in closed-loop plumbing systems, include an expansion tank mounted near the water heater’s cold water inlet, often directly above it. This tank accommodates the expanded volume of water as it heats, preventing excessive pressure buildup. If the expansion tank itself fails, or if its connecting fittings leak, the drip will appear to come from the top of your water heater setup.
Internal Tank Failure (Rare for Top Leaks)
While less common for a leak specifically from the very top, severe internal tank corrosion can occasionally manifest near the top connections if the tank wall weakens significantly at those points. However, internal tank failures typically result in leaks from the bottom of the unit. If you’ve ruled out all external components and suspect the tank itself is compromised at the top, replacement is likely the only option.
How to Safely Diagnose a Water Heater Top Leak
When you notice water pooling around the top of your water heater, quick and careful diagnosis is essential. Prioritizing safety is paramount before you begin any inspection.
Step 1: Prioritize Safety – Shut Off Utilities
Before touching any part of your water heater, you must disable its power source. For electric water heaters, locate the dedicated circuit breaker in your home’s electrical panel and switch it off. For gas water heaters, turn the gas supply valve (usually a knob or lever on the gas line leading to the unit) to the “OFF” position. Next, shut off the main water supply to the water heater. There’s typically a shut-off valve on the cold water inlet pipe at the top of the unit; turn it clockwise until it’s fully closed.
Step 2: Inspect Key Top Components
With utilities safely off, begin a thorough visual inspection of all components at the top of your water heater.
- Water Line Connections: Examine the hot water outlet and cold water inlet pipes and their threaded connections. Look for visible water droplets, rust stains, or mineral deposits that indicate a leak.
- T&P Relief Valve: Check the valve itself and the discharge pipe connected to it for drips or signs of water.
- Anode Rod Port: This is usually a hex-head fitting at the very top of the tank. Look for moisture or corrosion around it.
- Heating Element Covers (Electric Models): Remove the access panels (after ensuring power is off) and inspect around the heating element gaskets for any signs of water.
- Expansion Tank (If present): Look for leaks on the tank itself or its connection to the cold water inlet.
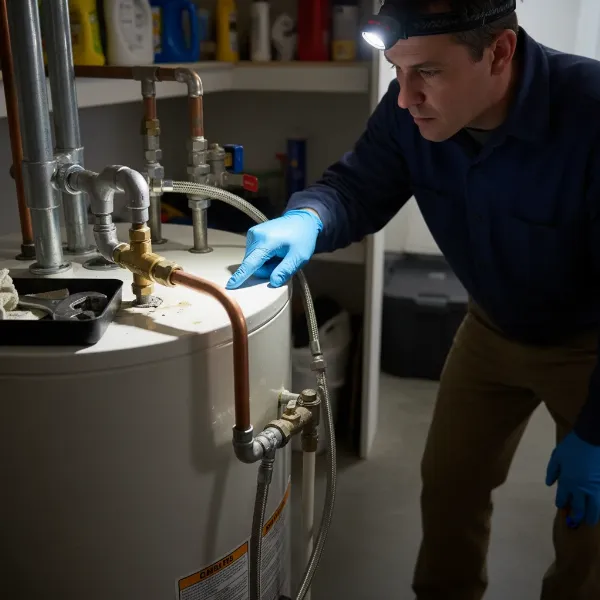 A person inspecting the top of a water heater, highlighting the T&P valve, inlet/outlet pipes, and anode rod for leaks, diagnostic process
Step 3: Pinpointing the Exact Source
Sometimes, water can drip from one component and trickle down, making it appear as if another part is leaking. To pinpoint the exact source, use a dry paper towel or cloth to carefully wipe down all areas around the top of the tank. Then, observe closely for fresh water droplets. Start from the highest points and work your way down. This method helps trace the water back to its true origin. If water quickly reappears after wiping, you’ve likely found the leak.
Step-by-Step Solutions to Fix a Leaking Water Heater Top
Once you’ve identified the source of the leak, you can determine if it’s a DIY fix or if a professional is needed. Always ensure the power/gas and water supply are off before attempting any repairs.
Tightening Loose Connections
If the leak is from the hot or cold water line connections, often a simple tightening can resolve the issue. Using a wrench, carefully turn the fitting clockwise. Be firm but avoid over-tightening, which can strip threads or damage pipes. After tightening, turn the water supply back on and check for drips. If the leak persists, the fitting or pipe itself may be corroded and need replacement.
Replacing a Faulty T&P Relief Valve
If your T&P valve is leaking, and you’ve confirmed there’s no excessive pressure (e.g., by checking your home’s water pressure), the valve itself is likely faulty.
- Drain the Tank: Connect a hose to the drain valve at the bottom of the water heater and open a hot water faucet in your home to break the vacuum. Let about 5-10 gallons drain to lower the water level below the T&P valve.
- Unscrew the Old Valve: Use a pipe wrench to carefully unscrew the old T&P valve.
- Install New Valve: Apply Teflon tape or pipe sealant to the threads of the new T&P valve and screw it into place. Ensure it’s hand-tight, then tighten with a wrench for another quarter to half turn.
- Refill and Test: Close the drain valve, remove the hose, and turn on the water supply. Open a hot water faucet until all air is purged, then check for leaks.
Addressing Anode Rod Leaks
A leak around the anode rod opening often indicates a loose rod or a deteriorated washer.
- Drain Tank: Similar to the T&P valve replacement, drain enough water from the tank to lower the level below the anode rod opening.
- Remove Old Rod: Use a large socket wrench (often 1 1/16 or 1 1/16 inches) to unscrew the old anode rod. This can require significant force, as they can corrode in place.
- Clean and Seal: Clean the threads around the opening. Apply new Teflon tape or pipe sealant to the threads of a new anode rod.
- Install New Rod: Carefully screw in the new anode rod and tighten it securely.
- Refill and Test: Restore water supply and check for leaks. Consider replacing the anode rod regularly as part of maintenance to prevent this issue.
Replacing Heating Element Gaskets (Electric Models)
This repair requires careful handling of electrical components. If unsure, call a professional.
- Turn Off Power and Water: Absolutely critical. Drain the tank completely.
- Access Elements: Remove the access panels and insulation covering the heating elements.
- Disconnect Wires: Carefully disconnect the electrical wires from the element terminals.
- Remove Element: Use an element wrench to unscrew and remove the old heating element.
- Replace Gasket: Ensure the new gasket is properly seated around the new element.
- Install New Element: Screw the new element into the tank and tighten it securely.
- Reconnect Wires & Refill: Reconnect the electrical wires, replace access panels and insulation, then refill the tank before restoring power.
What About Expansion Tank Leaks?
If the expansion tank itself is leaking, it likely needs replacement. If the leak is at its connection to the cold water inlet, try tightening the fitting. If that doesn’t work, the fitting or the connection point on the water heater may need attention, potentially requiring a plumber.
> “Ignoring a water heater leak, no matter how small, is a recipe for disaster. What starts as a minor drip can quickly escalate into significant property damage or even pose safety risks.” – John Davis, Master Plumber and Water Heater Specialist
When to Call a Professional Plumber
While some top leaks are DIY-friendly, others warrant professional help.
- Persistent Leaks: If you’ve tightened connections or replaced components and the leak continues.
- Tank Corrosion: Any sign of rust or corrosion on the water heater tank itself, especially around the top fittings, often indicates internal tank deterioration. This usually means the entire unit needs to be replaced.
- Uncertainty: If you’re unsure about the leak source, uncomfortable with the repair process, or dealing with gas lines, always call a licensed plumber.
- High Water Pressure: If your T&P valve is constantly discharging, it could signal dangerously high water pressure in your home, which a plumber can diagnose and fix.
Preventing Future Top Leaks and Extending Water Heater Life
Proactive maintenance is your best defense against unexpected water heater leaks and can significantly extend the lifespan of your unit.
Regular Inspections and Maintenance
Make it a habit to visually inspect the top of your water heater periodically. Look for any moisture, rust, or mineral buildup around the connections, valves, and ports. Annual flushing of your water heater tank helps remove sediment buildup, which can contribute to corrosion and pressure issues.
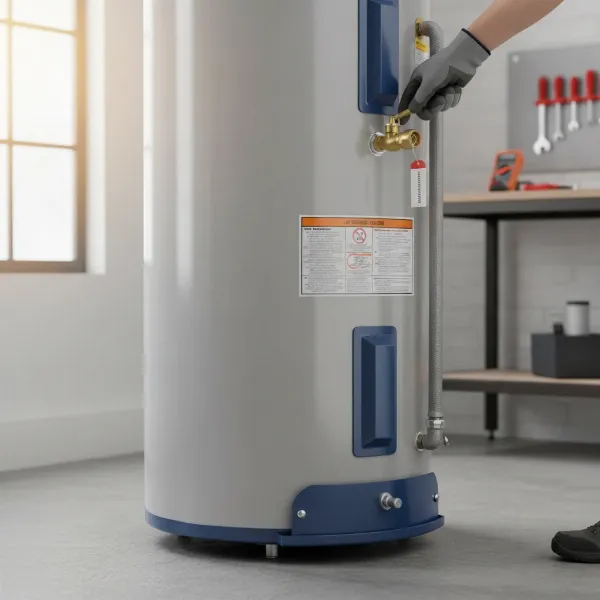 A homeowner performing preventative maintenance on a water heater, checking connections and T&P valve, clean and organized area
Testing the T&P Valve
Test your T&P valve annually to ensure it’s functioning correctly. Place a bucket under the discharge pipe. Carefully lift the lever on the valve for a few seconds to release a small amount of water, then let it snap shut. If water doesn’t come out, or if it continues to drip after you release the lever, the valve may be faulty and needs replacement.
Ensuring Proper Installation
Many leaks can be traced back to improper installation. When replacing a water heater or having new connections made, ensure a qualified professional performs the work. Proper pipe dope or Teflon tape application, correct torque on fittings, and the use of appropriate dielectric unions (to prevent galvanic corrosion between dissimilar metals) are all critical for a leak-free system.
Conclusion
A water heater leaking from the top can be a worrying sight, but by systematically identifying the source, you can often address the problem effectively. From tightening a loose connection to replacing a T&P valve or anode rod, many of these issues are manageable with the right knowledge and tools. However, recognizing when to call in a professional plumber is equally important, especially when dealing with internal tank corrosion or complex issues. Regular maintenance and vigilant inspections are your best allies in preventing these leaks and ensuring your water heater continues to provide reliable hot water for years to come. Don’t let a small drip become a flood – take action swiftly and confidently. Have you inspected your water heater lately?
Frequently Asked Questions
Is a water heater leaking from the top serious?
Yes, any water heater leak is serious and should be addressed immediately. Even a small leak can lead to significant water damage, mold growth, increased utility bills due to inefficiency, and potentially indicate a more critical underlying issue with your unit.
Can I still use my water heater if it’s leaking from the top?
No, it is strongly advised to turn off your water heater’s power/gas supply and water supply immediately if it’s leaking from the top. Continuing to use a leaking unit can worsen the problem, cause further damage, and create unsafe conditions.
How much does it cost to fix a water heater leaking from the top?
The cost to fix a top water heater leak varies depending on the cause. Simple fixes like tightening a connection might cost nothing, while replacing a T&P valve or anode rod could range from $100-$300 for parts and labor. If internal tank corrosion is the cause, a full water heater replacement, costing $1,000-$3,000+, is usually necessary.
How often should I check my water heater for leaks?
It’s recommended to visually inspect your water heater, including the top components, at least once every six months. Include this check as part of your annual water heater maintenance, which should also involve flushing the tank and testing the T&P valve.
What’s the difference between a top leak and a bottom leak?
A top leak typically originates from external connections, valves, or components at the upper part of the water heater, often repairable. A bottom leak, however, usually signals severe internal tank corrosion or failure, meaning the tank has rusted through, and replacement of the entire Water Heater unit is almost always required.