A constant drip or a sudden gush from your water heater’s Pressure Relief Valve (TPR) can be alarming. This small, often overlooked component plays a monumental role in the safety of your home, preventing catastrophic events like tank explosions. While a leak might indicate the valve is doing its job, it often signals a deeper issue that demands immediate attention. Understanding why your TPR valve might be leaking and knowing how to address it can save you from costly repairs and ensure your hot water system operates safely and efficiently. This guide will walk you through the causes, troubleshooting steps, and fixes for a leaking TPR valve, empowering you to maintain your water heater with confidence.
Understanding Your Water Heater’s Pressure Relief Valve (TPR)
The Temperature and Pressure Relief (TPR) valve is a crucial safety mechanism integrated into your water heater. Its primary function is to relieve excessive temperature and pressure within the tank, preventing dangerous conditions that could lead to rupture or explosion. Designed to activate when either the internal water temperature exceeds 210°F or the pressure surpasses 150 PSI, the TPR valve automatically opens, discharging a small amount of hot water to reduce the stress inside the tank.
This valve acts as a last line of defense. Without a properly functioning TPR valve, a buildup of extreme pressure and temperature could transform your water heater into a potential bomb, highlighting why its proper operation is not just important, but absolutely critical for the safety of your household.
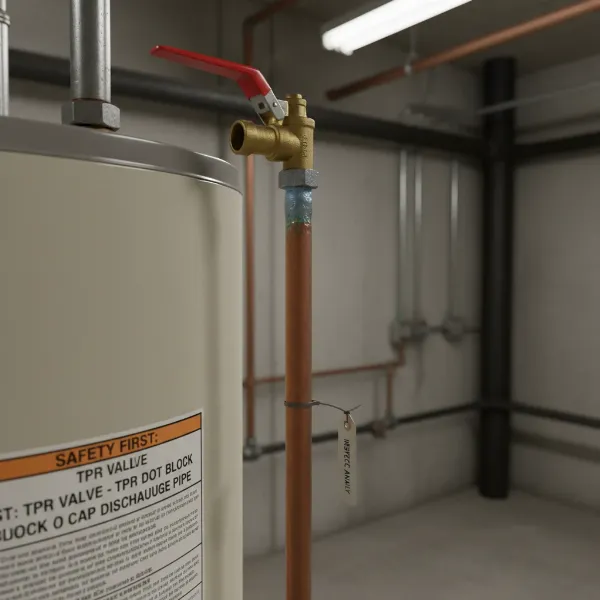 A close-up view of a water heater's TPR valve with a discharge pipe, emphasizing its safety function.
Common Reasons Your TPR Valve May Be Leaking
When your TPR valve starts to leak, it’s typically trying to tell you something. While sometimes it’s a sign the valve is simply doing its job, persistent leaks often point to underlying issues within your water heater system.
One of the most frequent culprits is high water pressure. This can occur due to thermal expansion in a closed plumbing system, where heated water has no room to expand, leading to increased pressure. If your home lacks an expansion tank, or if an existing one is faulty or waterlogged, this thermal expansion can force the TPR valve to release water. Alternatively, excessive municipal water pressure, possibly combined with a malfunctioning Pressure Reducing Valve (PRV) on your main water line, can also cause internal tank pressure to rise above safe limits.
Another significant factor is high water temperature. If your water heater’s thermostat is set too high or if it’s malfunctioning, the water inside the tank can reach dangerously high temperatures. The TPR valve is designed to open and relieve this excess heat, often resulting in a noticeable leak. Sediment buildup at the bottom of the tank can also contribute to overheating by insulating the heating element, making the thermostat inaccurate.
Finally, the TPR valve itself might be faulty or old. Like any mechanical component, TPR valves can wear out over time. Internal corrosion, mineral deposits, or a weakened spring can prevent the valve from sealing properly after it’s been triggered, or even cause it to open prematurely. A valve that doesn’t fully close after releasing pressure will manifest as a continuous drip. It’s important to distinguish between a brief, intermittent drip (which might be the valve operating as intended during normal pressure fluctuations) and a persistent, ongoing leak, which almost always signals a problem.
Troubleshooting a Leaking TPR Valve: A Step-by-Step Guide
Addressing a leaking TPR valve requires a systematic approach, starting with safety and progressing through various diagnostic steps.
Always prioritize safety first. Before attempting any troubleshooting or repairs on your water heater, turn off its power supply. For electric water heaters, this means flipping the circuit breaker at your electrical panel. For gas water heaters, turn the gas control knob to the “Pilot” setting or completely off, and also shut off the main gas supply valve. Next, turn off the cold water supply valve leading to your water heater.
Once safe, observe the leak. Is it a constant, steady drip, or does it release a gush of water intermittently? A persistent drip often indicates a faulty valve or continuous high pressure, while intermittent gushes might point more strongly to thermal expansion.
Check your home’s water pressure using a water pressure gauge. Attach the gauge to an outdoor spigot or laundry tub faucet and record the reading. Normal household water pressure should typically be between 40-80 PSI. If your reading consistently exceeds 80 PSI, excessive incoming water pressure is likely contributing to the problem.
Next, verify your water temperature. Check the thermostat setting on your water heater. Most manufacturers recommend a setting around 120°F (approximately 49°C) for optimal safety and efficiency. You can confirm the actual water temperature by running hot water at a nearby faucet for a few minutes and measuring it with a meat thermometer. If the temperature is significantly higher than 120-125°F, it could be the cause of the leak.
Finally, inspect the TPR valve and the surrounding system. Look for any visible signs of damage, corrosion, or sediment buildup around the valve and its discharge pipe. If you have an expansion tank, check it for signs of leaks or if it feels waterlogged (tap it; a working tank will sound hollow, a waterlogged one will sound solid). These observations will help you pinpoint the root cause of the TPR valve leak.
How to Fix a Leaking TPR Valve
Once you’ve diagnosed the likely cause of your TPR valve leak, you can proceed with the appropriate fix. Remember, if you are uncomfortable with any step, it’s always best to call a professional plumber.
Addressing Underlying Causes:
If your troubleshooting indicated high pressure or temperature, start by addressing those issues rather than just replacing the valve.
- Adjust Thermostat Settings: If your water temperature is too high, lower the thermostat setting on your water heater to a safe and recommended 120-125°F (49-52°C). Allow several hours for the water to cool and the system to stabilize before checking if the leak stops.
- Install or Service an Expansion Tank: For high pressure caused by thermal expansion in a closed system, an expansion tank is essential. If you don’t have one, consider installing it. If you do, check its air pressure (it should match your home’s water pressure) and ensure it’s not waterlogged. A waterlogged tank means the internal diaphragm has failed and the tank needs replacement.
- Install or Adjust a Pressure Reducing Valve (PRV): If your home’s incoming water pressure is consistently above 80 PSI, installing a PRV on your main water line can regulate it to a safe level. If you already have one, it might need adjustment or replacement if it’s failing to maintain proper pressure.
- Flush the Water Heater to Remove Sediment: Sediment buildup can cause hot spots and lead to overheating. Regularly flushing your water heater helps remove these deposits, improving efficiency and potentially resolving temperature-related TPR valve leaks.
Replacing a Faulty TPR Valve:
If the TPR valve itself is old, corroded, or has a manufacturing defect, replacement is the most direct solution.
Tools needed:
- Adjustable wrench or pipe wrench
- Teflon tape (plumber’s tape)
- Garden hose
- Bucket
- New TPR valve (ensure it matches the pressure and temperature ratings of your existing valve and tank)
Step-by-step instructions for replacement:
- Shut off power/gas and cold water: As emphasized in the troubleshooting section, always disconnect power (or turn off gas supply) and close the cold water inlet valve to the water heater.
- Drain the tank below the TPR valve level: Connect a garden hose to the drain valve at the bottom of the water heater and direct it to a floor drain or outside. Open a hot water faucet inside your home to break any vacuum and allow air to enter, facilitating drainage. Drain enough water until the level is below the TPR valve’s location.
- Remove the discharge pipe: Use a wrench to detach the discharge pipe that extends from the TPR valve.
- Unscrew and remove the old valve: With a wrench, carefully turn the old TPR valve counter-clockwise to unthread it from the tank. Be prepared for a small amount of residual water to escape.
- Prepare and install the new valve: Wrap the threads of the new TPR valve with 3-5 layers of Teflon tape in a clockwise direction. This creates a watertight seal. Thread the new valve into the opening on the water heater by hand, then tighten it securely with a wrench, ensuring the outlet for the discharge pipe points downwards. Do not overtighten.
- Reinstall discharge pipe: Connect the discharge pipe back to the new TPR valve.
- Refill the tank and purge air: Close the drain valve at the bottom of the tank and remove the garden hose. Open the cold water inlet valve to refill the water heater. Keep a hot water faucet open inside your home until a steady stream of water flows out, indicating that all air has been purged from the tank.
- Restore power/gas and check for leaks: Once the tank is full and air is purged, restore power or gas to the water heater. Carefully inspect around the newly installed TPR valve and its connections for any signs of leaks. Allow the water heater to reheat and monitor the valve for any dripping.
When to Call a Professional Plumber
While many TPR valve issues can be resolved with DIY efforts, there are specific situations where calling a professional plumber is not just advisable, but essential. If you’ve attempted basic troubleshooting and fixes, such as adjusting temperature or replacing the valve, but the leak persists, it indicates a more complex underlying problem that requires expert diagnosis.
Persistent high water pressure, for instance, might stem from issues with your municipal water supply or a more complicated failure in your home’s pressure-reducing valve, which a professional can accurately assess and repair. For gas water heaters, any work involving gas lines or components should always be handled by a licensed plumber due to the inherent safety risks.
Furthermore, if you feel uncertain or uncomfortable at any point during the troubleshooting or repair process, it’s always safer to defer to an experienced technician. They possess the specialized tools, knowledge, and experience to efficiently identify the problem and ensure the repair is done correctly and safely, providing you with peace of mind.
Essential Maintenance to Prevent TPR Valve Leaks
Proactive maintenance is key to prolonging the life of your water heater and preventing unexpected TPR valve leaks. Incorporating these simple tasks into your routine can save you from future headaches and potential safety hazards.
Perhaps the most critical maintenance task is annual TPR valve testing. To do this, simply place a bucket under the discharge pipe and lift the lever on the TPR valve for a few seconds. A burst of water should discharge, then stop completely when you release the lever. This process helps clear out any sediment or mineral buildup that could prevent the valve from operating correctly. If no water discharges or if the valve continues to drip after testing, it likely needs replacement.
Maintaining optimal water pressure in your home is also crucial. Regularly check your home’s water pressure with a gauge. If it’s consistently above 80 PSI, consider installing or servicing a pressure-reducing valve (PRV) to protect your entire plumbing system, including your water heater.
Ensure your water heater’s thermostat is set to the correct water temperature, typically 120-125°F (49-52°C). This setting balances energy efficiency with safety, preventing excessively hot water and reducing the likelihood of the TPR valve engaging due to high temperatures.
Finally, regularly flushing your water heater helps remove accumulated sediment. Sediment can reduce efficiency, create hot spots, and contribute to pressure and temperature fluctuations that might trigger your TPR valve. Flushing your tank annually or biennially, depending on your water quality, is a simple way to maintain its health.
Conclusion
A leaking Pressure Relief Valve (TPR) is more than just an annoyance; it’s a vital indicator of your water heater’s health and a critical safety warning. By understanding the common causes—from excessive pressure and temperature to a faulty valve itself—you can effectively troubleshoot the issue. Whether it involves adjusting your thermostat, installing an expansion tank, or performing a straightforward TPR valve replacement, taking prompt action is essential for the safety and longevity of your water heater. Regular maintenance, including annual testing and flushing, will further safeguard your system against future leaks. If ever in doubt, remember that a qualified plumber is always the best resource to ensure your water heater is operating safely and efficiently. Don’t let a small drip turn into a major problem; address your TPR valve leak today!
Frequently Asked Questions (FAQ)
Is a leaking TPR valve dangerous?
|
Our Picks for the Best Water Heater in 2026
As an Amazon Associate I earn from qualifying purchases.
|
||
| Num | Product | Action |
|---|---|---|
| 1 | Chefman Electric Kettle, 1.8L 1500W, Hot Water Boiler, Removable Lid for Easy Cleaning, Auto Shut Off, Boil-Dry Protection, Stainless Steel Filter, BPA Free, Borosilicate Glass Electric Tea Kettle |

|
| 2 | Portable Immersion Water Heater 1800W 120V, Electric Heater for Buckets, Bathtubs and Mini Pools, Submersible Design with Thermostat, Real Time Temperature Display and Dry Burn Protection |
|
| 3 | Cosori Electric Kettle, No Plastic Contact With Water, Wide Mouth For Easy Cleaning, Auto Shut Off, 1.7L Tea Kettle & Hot Water Boiler, Water Heater & Teapot, Borosilicate Glass, Black, 1500W |
|
| 4 | Amazon Basics Electric Kettle with Glass Carafe for Tea and Coffee, BPA-Free, Fast Boiling, Auto Shut-Off, 1 Liter, 1500W, Glass and Steel |
|
| 5 | Portable Water Heater 2000W, Pool Heater - Immersion Heater with Digital Thermometer, Upgraded Magnesium Oxide Heating for Fast Heating, for Small Pools, Bathtubs, Buckets, Tanks |
|
| 6 | Amazon Basics Electric Kettle with Glass Carafe for Tea and Coffee, BPA-Free, Fast Boiling, Auto Shut-Off, 1.7 Liter, 1500W, Black and Silver |
|
| 7 | Amazon Basics Electric Stainless Steel Kettle for Tea and Coffee, BPA-Free, Fast Boiling, Auto Shut-Off, 1.7 Liter, 1500W, Black and Silver |
|
| 8 | Zojirushi Micom Water Boiler and Warmer (135 oz. / 4L, Silver) |
|
| 9 | Immersion Water Heater Electric, 2000W Portable Water Heater with 304 S S Guard & LCD Thermometer, Fast Heating Bucket Heater, Ideal for Small Bucket Bathtub, Small Pool, Home Camping Outdoor Use |
|
| 10 | OVENTE Electric Kettle, 1.7L Fast Boiling Water Heater for Coffee or Tea, BPA Free with Water Level Gauge, Auto Shut-Off, Boil-Dry Protection, Indicator Light and Removable Filter, White KP72W |
|
Yes, a persistently leaking TPR valve can be dangerous. While it’s designed to release pressure and temperature, a continuous leak often indicates underlying system stress, such as dangerously high pressure or overheating within the tank. Ignoring it could lead to severe tank damage, rupture, or even an explosion, emphasizing the need for immediate investigation and repair.
How often should a TPR valve be replaced?
Most experts recommend replacing your TPR valve every five years, or sooner if it shows signs of continuous leaking, corrosion, or fails its annual test. Even if it appears to be working, internal components can degrade, making routine replacement a critical safety measure to ensure its reliability when needed most.
Can I simply cap a leaking TPR valve?
Absolutely not. Capping a leaking TPR valve is extremely dangerous and could lead to catastrophic failure of your water heater. The valve is a safety device designed to release pressure and temperature. Blocking it prevents this essential function, allowing pressure to build unchecked, which can result in the Water Heater exploding. Always address the root cause of the leak or replace the valve instead.