Installing a new water heater or replacing an old one often involves working with copper piping, a robust and long-lasting material. While alternative connection methods exist, soldering (also known as sweating) provides a uniquely durable and secure seal, making it a preferred choice for many seasoned technicians. If you’re looking to achieve professional-quality connections for your water heater, mastering the art of soldering copper pipes is an invaluable skill. This guide will walk you through every critical step, from gathering your tools to troubleshooting common issues, ensuring your water heater operates flawlessly for years to come.
Preparing for Water Heater Pipe Soldering: Tools and Materials
Before you even think about applying heat, proper preparation is paramount. Having the right tools and materials on hand ensures a smooth process and a reliable joint. Neglecting this stage can lead to frustrating leaks and wasted effort.
-
Essential Tools You’ll Need:
- Pipe Cutter: For precise, square cuts on copper tubing. A close-quarters cutter is useful for tight spaces.
- Reaming Tool or Deburring Accessory: To remove internal burrs created by cutting, preventing flow restrictions and potential debris buildup.
- Sand Cloth or Abrasive Mesh: For cleaning the exterior of copper pipes.
- Fitting Brush: Specifically sized brushes to clean the interior of copper fittings.
- Acid Brush: For applying flux.
- Torch: A propane torch is common, but MAPP gas or oxy-acetylene torches burn hotter and are often preferred for faster, more efficient heating, especially on larger pipes.
- Flame Protector: A heat-resistant mat or shield to protect surrounding surfaces from the torch flame.
- Safety Gear: Heat-resistant gloves and safety goggles are non-negotiable.
- Fire Extinguisher: Always keep one readily accessible.
- Dry and Damp Rags: For cleaning and cooling.
-
Critical Materials:
- Copper Pipe and Fittings: Ensure they are clean and free from damage.
- Lead-Free Solder: Essential for potable water systems to prevent lead contamination. Look for options like Oatey® Safe-Flo®.
- Flux: This chemical cleaning agent helps solder flow evenly and prevents oxidation during heating. Water-soluble fluxes (like Oatey® H-20®) are easier to flush, while tinning fluxes can aid in filling larger joints.
Starting with a complete toolkit and high-quality materials sets the stage for a successful soldering project. Don’t cut corners on safety or supplies, as the integrity of your water heater connections depends on it.
The Foundation of a Strong Joint: Cutting, Cleaning, and Fluxing
The secret to a perfect solder joint lies not just in the heat application, but in the meticulous preparation of the copper. This foundational stage dictates how well the solder will flow and bond, creating a watertight seal for your water heater system.
Precise Pipe Cutting and Deburring
|
Our Picks for the Best Water Heater in 2026
As an Amazon Associate I earn from qualifying purchases.
|
||
| Num | Product | Action |
|---|---|---|
| 1 | Chefman Electric Kettle, 1.8L 1500W, Hot Water Boiler, Removable Lid for Easy Cleaning, Auto Shut Off, Boil-Dry Protection, Stainless Steel Filter, BPA Free, Borosilicate Glass Electric Tea Kettle |

|
| 2 | OVENTE Electric Kettle, 1.7L Fast Boiling Water Heater for Coffee or Tea, BPA Free with Water Level Gauge, Auto Shut-Off, Boil-Dry Protection, Indicator Light and Removable Filter, White KP72W |
|
| 3 | Amazon Basics Electric Kettle with Glass Carafe for Tea and Coffee, BPA-Free, Fast Boiling, Auto Shut-Off, 1 Liter, 1500W, Glass and Steel |
|
| 4 | Amazon Basics Electric Kettle with Glass Carafe for Tea and Coffee, BPA-Free, Fast Boiling, Auto Shut-Off, 1.7 Liter, 1500W, Black and Silver |
|
| 5 | Amazon Basics Electric Stainless Steel Kettle for Tea and Coffee, BPA-Free, Fast Boiling, Auto Shut-Off, 1.7 Liter, 1500W, Black and Silver |
|
| 6 | Cosori Electric Kettle, No Plastic Contact With Water, Wide Mouth For Easy Cleaning, Auto Shut Off, 1.7L Tea Kettle & Hot Water Boiler, Water Heater & Teapot, Borosilicate Glass, Black, 1500W |
|
| 7 | Immersion Water Heater Electric, 2000W Portable Water Heater with 304 S S Guard & LCD Thermometer, Fast Heating Bucket Heater, Ideal for Small Bucket Bathtub, Small Pool, Home Camping Outdoor Use |
|
| 8 | Zojirushi Micom Water Boiler and Warmer (135 oz. / 4L, Silver) |
|
| 9 | Portable Immersion Water Heater 1800W 120V, Electric Heater for Buckets, Bathtubs and Mini Pools, Submersible Design with Thermostat, Real Time Temperature Display and Dry Burn Protection |
|
| 10 | Portable Water Heater 2000W, Pool Heater - Immersion Heater with Digital Thermometer, Upgraded Magnesium Oxide Heating for Fast Heating, for Small Pools, Bathtubs, Buckets, Tanks |
|
First, measure your copper pipe accurately to the desired length. Use a pipe cutter to make a square, clean cut. Avoid overtightening the cutter, which can deform the pipe. Once cut, it’s crucial to deburr the inside of the pipe. A reaming tool or a deburring attachment on your pipe cutter will remove any internal burrs. These small metal fragments can restrict water flow, cause cavitation, and even harbor debris over time, so addressing them is a simple yet vital step.
The Critical Clean
Copper naturally oxidizes, forming a thin layer that prevents solder from bonding properly. To ensure a strong, leak-free connection, both the pipe’s exterior and the fitting’s interior must be thoroughly cleaned. Use sand cloth or abrasive mesh to scour the outside of the pipe until it’s shiny bright. For the inside of the fitting, a fitting brush of the appropriate size is indispensable for removing all traces of oxidation. After cleaning, avoid touching the prepped surfaces with your bare hands, as the oils from your skin can create a barrier that hinders solder flow.
Applying Flux Correctly
Flux is a non-negotiable component in soldering; it acts as a wetting agent, allowing the molten solder to flow into the joint by capillary action, and prevents re-oxidation as the metal heats. Apply a thin, even layer of flux to both the outside of the pipe end and the inside of the fitting using an acid brush. Remember, more isn’t necessarily better; excess flux can lead to messy solder runs and corrosion if not properly removed. Ensure complete, but not excessive, coverage for optimal results.
Ensuring Dry Pipes
Perhaps the most overlooked, yet absolutely critical, step is ensuring that the pipes are completely dry. Even a small amount of residual water inside the pipe will instantly turn into steam when heated. This steam can “blow through” the molten solder, creating pinholes or voids in the joint that will inevitably lead to leaks. If you’re working on an existing system, ensure all water has been drained and dried. For stubborn drips, some plumbers use a small piece of white bread shoved into the pipe to temporarily absorb any moisture, dissolving harmlessly once water flow resumes.
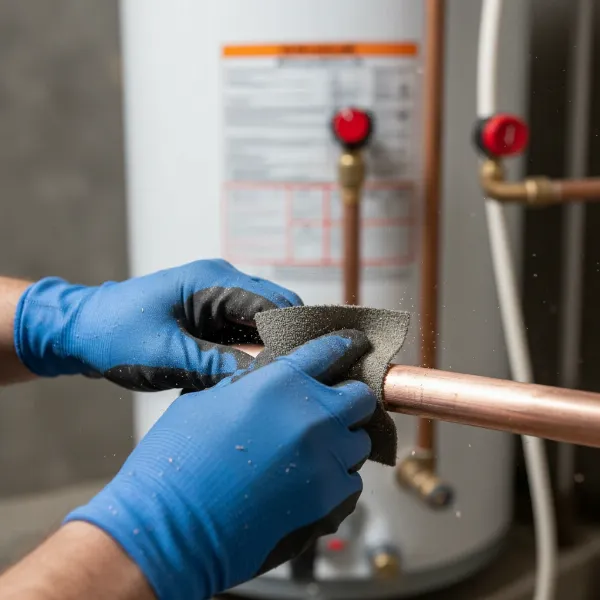 Technician cleaning copper pipes before soldering for a water heater install
Mastering the Heat: Soldering Techniques for Water Heater Pipes
Once your pipes are immaculately prepared, the actual soldering process begins. This phase requires a delicate balance of heat application and solder management to create robust and lasting connections for your water heater.
Assembling the Joint
After applying flux, immediately assemble the joint. Insert the pipe fully into the fitting, giving it a slight twist to ensure the flux is evenly distributed. Confirm that the pipe is bottomed out in the fitting and properly aligned. Once assembled, avoid disturbing the joint, as this can compromise the flux layer and create issues for solder flow.
Torch Handling and Heat Application
Choosing the correct torch tip size is important; smaller tips are suitable for pipes 1 inch and under, while larger diameters require medium or large tips to deliver adequate heat. Hold your torch at roughly a 45-degree angle, directing the flame toward the fitting side of the joint, not directly onto the pipe. The fitting is generally thicker and requires more heat. Your goal is to heat the entire joint evenly. Start at the base of the fitting and work your way around, ensuring uniform temperature. Solder typically melts between 360°F and 460°F, so aim for a pipe surface temperature of around 500°F. An oversized tip on a small pipe can overheat the joint and burn off the flux, leading to solder failure.
Applying Solder with Precision
Once the joint reaches the correct temperature, touch the tip of your lead-free solder to the opposite side of the fitting from where your flame is directed. The molten solder should immediately be drawn into the joint by capillary action, appearing to “disappear” into the gap between the pipe and fitting. Continue to move the solder around the joint, allowing it to flow completely. A general rule of thumb is to use a length of solder roughly equal to the diameter of the pipe (e.g., a ½-inch pipe needs about ½-inch of solder). Don’t overdo it; excess solder doesn’t improve the seal and can drip or scorch. If the solder melts and simply drips off, it’s often an indication of uneven heating or improper cleaning/flux application.
“A well-soldered joint is more than just a connection; it’s a testament to patience, precision, and an understanding of materials. The capillary action is your best friend – let the heat do the work, drawing the solder in for a perfect seal every time.” – Johnathan Reed, Master Plumber and Water Heater Specialist
Dealing with Challenging Situations
Working in confined spaces or with multiple fittings can present challenges. Always shield nearby combustible surfaces with a flame protector, and consider dampening any wood or insulation in tight areas. When soldering fittings with multiple joints, such as a T-fitting, try to position the adjacent joints horizontally. This prevents gravity from pulling apart a previously soldered joint if the heat from your current work softens it.
Ensuring Longevity: Post-Soldering Steps and Troubleshooting
The job isn’t quite done after the solder cools. Proper finishing and testing are crucial for a truly reliable water heater connection. Knowing how to spot and fix common mistakes can save you significant time and frustration.
Wiping and Cooling the Joint
As soon as you’ve finished applying solder, and while the joint is still hot but not molten, use a damp rag to wipe away any excess flux and solder. This step is critical for preventing corrosion and removing acidic flux residue, which can cause the greenish patina often seen on older copper. Follow up with a dry rag for a clean, residue-free finish. Allow the joint to cool naturally. While a damp rag can gently speed up the cooling process if you need to continue working, avoid shocking the hot metal with cold water immediately, as this could compromise the integrity of the newly formed joint.
Testing for Leaks
Patience is key; let the joint fully cool before subjecting it to pressure. For a DIY water heater installation, carefully turn on the water supply and visually inspect all new solder joints for any signs of leaks. For more complex systems or if you want to be extra thorough, especially after multiple joints, consider pressurizing the system with air first. This allows you to locate any potential leaks early without introducing water, making rework much cleaner if a joint needs attention. A faulty joint can often be reheated, re-fluxed, and re-soldered if caught before water flows through it.
Common Soldering Mistakes and How to Avoid Them
- Overheating: If the copper turns a dark cherry red or the flame itself turns green, you’ve likely overheated the joint. This can burn off the flux and prevent proper solder adhesion, leading to a weak joint. Use the correct torch tip and consistent heat.
- Insufficient Cleaning: Any dirt, oil, or oxidation on the copper surfaces will act as a barrier, preventing the solder from flowing properly and bonding. Always ensure surfaces are shiny bright before fluxing.
- Excess Solder: While it might seem like more solder equals a stronger joint, it’s often a sign that the joint wasn’t heated evenly or cleaned adequately. Excess solder doesn’t improve the seal and can create internal restrictions.
- Water in the Line: As previously mentioned, steam from residual water is a solder’s worst enemy. Ensure the pipes are completely dry before heating.
- Improper Flux Application: Too little flux won’t allow proper capillary action, while too much can cause messy drips and future corrosion. Aim for a thin, even coating.
When Alternatives Make Sense
While soldering offers superior durability, it’s worth noting that alternatives like push-to-connect fittings (e.g., SharkBite) or PEX crimp connections are available and can be quicker for certain scenarios, particularly for DIYers or in emergency repairs. However, for permanent, in-wall, or outdoor plumbing connections where long-term reliability is paramount, a properly sweated copper joint remains the gold standard, often required by code where high heat or durability is a concern near a water heater.
Conclusion
Soldering copper pipes for your water heater installation is a craft that, while requiring attention to detail, offers immense satisfaction and the confidence of a job well done. By meticulously preparing your materials, understanding the nuances of heat application, and applying solder with precision, you can create leak-free, enduring connections that will serve your home for decades. This time-honored plumbing skill not only ensures the safety and efficiency of your hot water system but also empowers you with the expertise of a true professional.
Are you ready to take on the challenge and secure your home’s hot water supply with the strength of soldered copper?
Frequently Asked Questions
What is the ideal temperature for soldering copper pipes?
The pipe surface temperature should reach approximately 500°F (260°C). Solder typically melts between 360°F and 460°F (182°C and 238°C), and the slightly higher pipe temperature ensures proper flow and capillary action into the joint for a strong bond.
Can I use a propane torch for soldering copper pipes on a water heater?
Yes, a propane torch can be used, especially for smaller diameter pipes. However, MAPP gas or oxy-acetylene torches burn hotter, allowing for faster and more efficient heating, which is often preferred for larger pipes or in colder conditions to prevent overheating the copper.
Why is it so important for pipes to be completely dry before soldering?
Any moisture inside the pipe will turn to steam when heated, which can forcefully escape through the molten solder, creating voids, pinholes, or blowing the solder out of the joint. This inevitably leads to leaks in your Water Heater connections.
How much solder should I use for a joint?
A good rule of thumb is to use a length of solder roughly equal to the diameter of the pipe. For example, a ½-inch pipe would need about ½-inch of solder. Applying too much solder is wasteful and doesn’t improve the joint’s integrity.
What should I do if my solder joint leaks after cooling?
If a joint leaks, the best approach is to drain the water, reheat the joint to melt the solder, separate the pipe and fitting, clean both surfaces thoroughly again, re-apply flux, and then re-solder. Air testing before filling with water can help identify leaks earlier.