Maintaining your home’s water heater is often overlooked, yet it’s a critical task that can significantly extend its lifespan, improve efficiency, and prevent costly breakdowns. Imagine a silent workhorse in your basement or utility closet, constantly providing the hot water your family relies on. Over time, however, this workhorse accumulates sediment – a silent killer that chokes efficiency and can lead to premature failure. Draining your water heater is the most effective way to combat this buildup and ensure your system runs smoothly.
This comprehensive guide will walk you through the entire process of completely draining your tank-style water heater for maintenance. We’ll cover everything from essential safety precautions to step-by-step instructions, troubleshooting tips, and knowing when it’s time to call in a professional. By understanding and performing this vital task, you’ll safeguard your investment, enjoy consistent hot water, and potentially save on energy bills and future repair costs.
Why Draining Your Water Heater is Crucial
Regularly draining and flushing your water heater is more than just a recommendation; it’s an essential part of its preventative care. Neglecting this simple maintenance can lead to a host of problems that impact both your comfort and your wallet.
Over time, minerals like calcium and magnesium, naturally present in your water supply, settle at the bottom of your water heater tank as sediment. This buildup creates an insulating layer between the heating element (or burner) and the water, forcing your unit to work harder and longer to heat water. This inefficiency directly translates to higher energy consumption and increased utility bills. Furthermore, sediment can corrode the tank from the inside, leading to leaks and ultimately, premature failure of the entire unit. Regular draining removes this destructive buildup, ensuring your heater operates at peak efficiency.
Draining also plays a significant role in prolonging the lifespan of your appliance. By removing corrosive minerals and preventing overheating caused by sediment, you reduce wear and tear on internal components. This simple act of maintenance can add years to your water heater’s life, delaying the expensive prospect of replacement. Moreover, it prevents the inconvenience of sudden breakdowns, ensuring you always have a reliable supply of hot water.
Understanding Your Water Heater Type
While the core principles of heating water remain, water heaters come in several types, primarily categorized by how they store and heat water. This guide focuses specifically on tank-style water heaters, which hold a reserve of hot water ready for use. These are the units that accumulate sediment and require regular draining.
Tank-style water heaters (both electric and gas) feature a large insulated tank where water is heated and stored. They typically have a drain valve at the bottom for flushing out sediment.
In contrast, tankless water heaters, or on-demand water heaters, heat water directly without a storage tank. While they don’t accumulate sediment in the same way traditional tanks do, they still require periodic flushing to remove mineral scale from their heat exchangers. However, the process is different and usually involves specialized descaling solutions, making this guide less applicable to them. For this reason, all instructions and advice in this article pertain to tank-style water heaters.
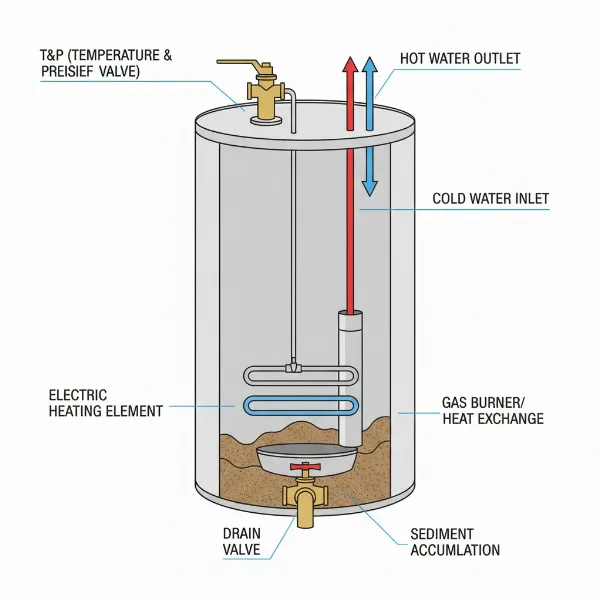 Diagram illustrating the internal components of a tank-style water heater, highlighting the drain valve and sediment location
Preparation: Safety First!
Before you begin any maintenance on your water heater, safety must be your top priority. Working with water, electricity, and potentially gas requires careful attention to detail. Skipping these crucial preparatory steps can lead to serious injury or damage to your appliance and home.
Turn Off Power or Gas Supply
|
Our Picks for the Best Water Heater in 2026
As an Amazon Associate I earn from qualifying purchases.
|
||
| Num | Product | Action |
|---|---|---|
| 1 | Immersion Water Heater Electric, 2000W Portable Water Heater with 304 S S Guard & LCD Thermometer, Fast Heating Bucket Heater, Ideal for Small Bucket Bathtub, Small Pool, Home Camping Outdoor Use |

|
| 2 | Amazon Basics Electric Kettle with Glass Carafe for Tea and Coffee, BPA-Free, Fast Boiling, Auto Shut-Off, 1 Liter, 1500W, Glass and Steel |
|
| 3 | Zojirushi Micom Water Boiler and Warmer (135 oz. / 4L, Silver) |
|
| 4 | OVENTE Electric Kettle, 1.7L Fast Boiling Water Heater for Coffee or Tea, BPA Free with Water Level Gauge, Auto Shut-Off, Boil-Dry Protection, Indicator Light and Removable Filter, White KP72W |
|
| 5 | Amazon Basics Electric Stainless Steel Kettle for Tea and Coffee, BPA-Free, Fast Boiling, Auto Shut-Off, 1.7 Liter, 1500W, Black and Silver |
|
| 6 | Chefman Electric Kettle, 1.8L 1500W, Hot Water Boiler, Removable Lid for Easy Cleaning, Auto Shut Off, Boil-Dry Protection, Stainless Steel Filter, BPA Free, Borosilicate Glass Electric Tea Kettle |
|
| 7 | Portable Immersion Water Heater 1800W 120V, Electric Heater for Buckets, Bathtubs and Mini Pools, Submersible Design with Thermostat, Real Time Temperature Display and Dry Burn Protection |
|
| 8 | Cosori Electric Kettle, No Plastic Contact With Water, Wide Mouth For Easy Cleaning, Auto Shut Off, 1.7L Tea Kettle & Hot Water Boiler, Water Heater & Teapot, Borosilicate Glass, Black, 1500W |
|
| 9 | Amazon Basics Electric Kettle with Glass Carafe for Tea and Coffee, BPA-Free, Fast Boiling, Auto Shut-Off, 1.7 Liter, 1500W, Black and Silver |
|
| 10 | Portable Water Heater 2000W, Pool Heater - Immersion Heater with Digital Thermometer, Upgraded Magnesium Oxide Heating for Fast Heating, for Small Pools, Bathtubs, Buckets, Tanks |
|
This is perhaps the most critical step. If you have an electric water heater, go to your home’s electrical service panel and switch off the circuit breaker that supplies power to the water heater. It’s often labeled or you can identify it by testing for hot water. For a gas water heater, locate the gas shut-off valve on the gas line leading to the unit and turn it to the “OFF” position. You should also turn the thermostat to “VACATION” or the lowest setting. Heating an empty or nearly empty tank will cause irreversible damage to the heating elements (electric) or the tank itself (gas), likely necessitating a full replacement.
Allow the Water Heater to Cool Down
After turning off the power or gas, it’s essential to allow the water inside the tank to cool. Draining extremely hot water is a significant burn hazard. Depending on the tank size and initial temperature, this can take several hours—at least two to three hours, or ideally, overnight. You can speed up the cooling process slightly by running a hot water faucet in your home until the water turns cold.
Gather Necessary Equipment
Having all your tools ready before you start will make the process smoother and more efficient:
- Garden Hose: A standard garden hose long enough to reach from your water heater to a suitable drainage area.
- Bucket or Utility Sink: For collecting water if an outdoor drain isn’t accessible or you need to gauge sediment.
- Flathead Screwdriver: Some drain valves require a flathead screwdriver to open.
- Pliers or Adjustable Wrench: May be needed for stubborn drain valves or hose connections.
- Work Gloves and Safety Glasses: For personal protection.
- Towels/Rags: For any minor spills.
Locate Drain & Shut-off Valves
Before you proceed, familiarize yourself with the key components involved. The cold water inlet valve is typically located at the top of the water heater, on the pipe where cold water enters the tank. This is usually a ball valve or gate valve that you’ll turn off. The drain valve is located at the very bottom of the tank, usually a brass or plastic spigot-like valve. The temperature and pressure (T&P) relief valve is usually on the top or side of the tank, with a discharge pipe running downwards. Knowing the location and function of these valves will be crucial for the draining process.
Step-by-Step Guide: How to Drain Your Water Heater
Once you’ve completed the safety checks and gathered your tools, you’re ready to begin the draining process. Follow these steps carefully to ensure a thorough and safe draining.
1. Shut Off Cold Water Supply
Locate the cold water inlet valve at the top of your water heater. Turn this valve off. This prevents new cold water from entering the tank as it drains, ensuring you’re only working with the water currently inside the unit. Ensure the valve is completely closed to prevent any water from flowing back into the tank during the draining process.
2. Connect Garden Hose
Attach one end of your garden hose securely to the drain valve at the bottom of the water heater. Ensure the connection is tight to prevent leaks. Direct the other end of the hose to a safe drainage area. This could be a floor drain, a large utility sink, or outside away from your foundation and any plants that could be damaged by hot, sediment-laden water. The water will be dirty and potentially hot, so choose your drainage spot wisely.
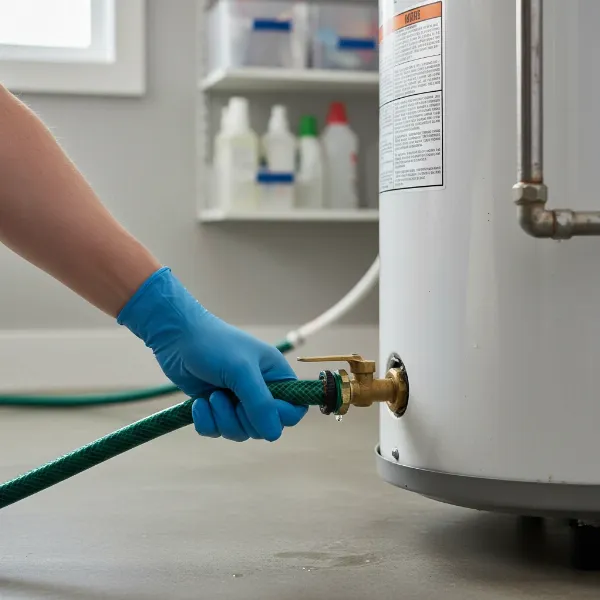 A technician connecting a garden hose to the drain valve of a water heater with proper safety gear
3. Open a Hot Water Faucet or T&P Valve
To prevent a vacuum from forming inside the tank, you need to introduce air into the system. You can do this in one of two ways:
- Open a hot water faucet: Go to any hot water faucet in your home (e.g., in a sink or bathtub) and turn it on to the “hot” position. Leave it open. This allows air to enter the plumbing system and the tank.
- Open the T&P Relief Valve: Alternatively, or in addition, you can lift the lever on the temperature and pressure (T&P) relief valve, usually located at the top or side of the water heater. This will also allow air to enter the tank. Be cautious, as some water or steam might initially escape from the discharge pipe.
> “Relieving system pressure and allowing air into the tank is a critical step often overlooked. Without it, you risk creating a vacuum that can make draining incredibly slow or even damage the tank.” – John Stevens, Certified Master Plumber
4. Open the Drain Valve
Now, it’s time to open the drain valve at the bottom of the water heater. Depending on the type of valve, you might turn a handle or use a flathead screwdriver to open it. As the valve opens, water will begin to flow out through the garden hose. The initial water may be clear, but as the tank empties, you’ll likely see cloudy, discolored, or gritty water due to the sediment being flushed out.
5. Flush Out Sediment
Allow the water to drain completely. For a truly thorough flush, once the flow slows to a trickle or stops, briefly open the cold water supply valve to the water heater for about 10-30 seconds, then close it again. This will create a surge of fresh water that stirs up any remaining sediment at the bottom of the tank, allowing it to be flushed out. Repeat this process of briefly turning on the cold water supply and then letting the tank drain until the water running through the hose appears clear. This ensures you’ve removed as much sediment as possible.
6. Completely Emptying (Optional, for removal/major repair)
For standard maintenance flushing, the above steps are usually sufficient. However, if you need to move the water heater, replace a heating element, or perform other major repairs that require the tank to be absolutely empty, you might need to take extra steps. This could involve disconnecting the cold and hot water lines and even carefully tilting the tank to get the last bit of water out. Some professionals might remove the anode rod or a larger fitting near the bottom for faster, more complete drainage. For these more advanced scenarios, professional assistance is highly recommended due to the weight and potential for damage.
Refilling and Restarting Your Water Heater
Once the draining and flushing are complete, you need to properly refill and restart your water heater to ensure it functions correctly and safely.
1. Close Valves & Remove Hose
Begin by closing the drain valve at the bottom of the water heater securely. Ensure it’s tight enough to prevent any leaks once the tank refills. Next, close the hot water faucet you opened earlier or lower the lever on the T&P relief valve. Finally, disconnect the garden hose from the drain valve. Be mindful that there might be residual hot water in the hose.
2. Restore Cold Water Supply
Slowly reopen the main cold water inlet valve to the water heater. You will hear the tank begin to fill with water. It’s important to open this valve gradually to prevent any sudden pressure surges in your plumbing system.
3. Purge Air from System
With the cold water supply now open, go back to the hot water faucet in your home (or any hot water faucet) and turn it on. Let the water run until all air is purged from the tank and pipes, and a steady stream of cold water flows from the faucet. This ensures the tank is completely full before you restore power or gas. Running a faucet longer also allows any remaining air pockets to escape, preventing potential issues when the heating cycle begins. Once a steady stream of water is flowing, turn off the faucet.
4. Restore Power/Gas
Only after you are absolutely certain the water heater tank is completely full of water should you restore power or gas. For electric units, flip the circuit breaker back on. For gas units, turn the gas supply valve back to the “ON” position and relight the pilot light if necessary, following your manufacturer’s instructions. Your water heater will now begin heating the fresh water. Monitor the unit for any leaks or unusual sounds after restarting.
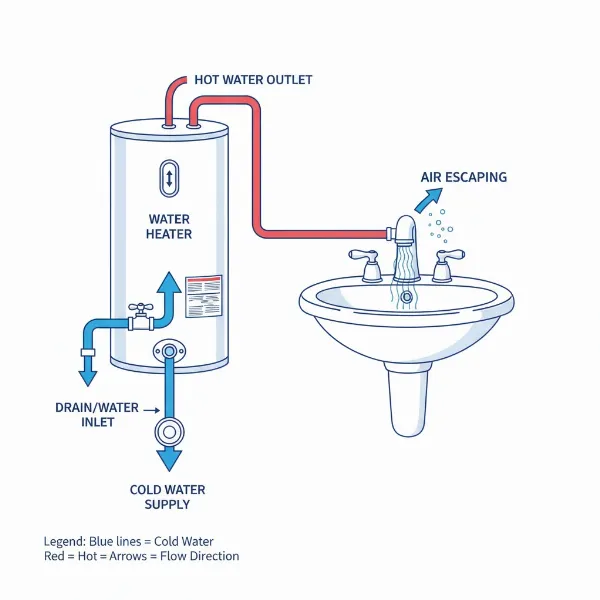 A diagram showing the refilling process of a water heater and air purging from a faucet
Troubleshooting Common Draining Issues
Even with careful preparation, you might encounter a few hiccups during the draining process. Here’s how to address some common problems:
Slow Draining / Clogged Drain Valve
If the water drains very slowly or stops flowing entirely, it’s often a sign of heavy sediment buildup blocking the drain valve.
- Try opening and closing the cold water supply briefly: This can create a surge of water to dislodge the clog.
- Use a wire or screwdriver: With caution, you can try gently probing the drain valve opening (with the hose removed and power off) to break up any soft sediment. Do not force anything.
- Call a professional: If the clog is severe and you cannot clear it safely, it’s best to call a plumber. Forcing it can damage the valve or tank.
Water Not Draining Completely
Sometimes, even after following all steps, a small amount of water remains in the bottom of the tank. This is often normal due to the design of the drain valve, which might be slightly above the very bottom of the tank. For routine maintenance, this small residual amount is usually not a concern. If complete emptying is critical for repairs or moving, you might need professional assistance as mentioned in the optional advanced draining steps. Ensure the T&P valve or a hot water faucet is open to prevent a vacuum lock, which can impede full drainage.
When to Call a Professional
While draining a water heater is a manageable DIY task for many homeowners, there are specific situations where professional help is not just advisable, but necessary:
- Persistent Issues: If you repeatedly experience slow draining, significant sediment buildup after recent flushing, or if the water never runs clear despite your efforts, a deeper problem might exist.
- Unfamiliarity with Gas/Electrical: If you are uncomfortable working with gas lines or your home’s electrical panel, always defer to a licensed professional. Safety should never be compromised.
- Older Units: Older water heaters (over 10-12 years) can have brittle components or heavily corroded drain valves, increasing the risk of leaks or damage during maintenance. A professional can assess the unit’s condition.
- Tankless Systems: As previously noted, tankless water heaters have different maintenance requirements involving descaling, which is best handled by technicians familiar with these specific units.
- Signs of Damage: If your water heater is already leaking, producing consistently discolored water (beyond initial sediment), or exhibiting other signs of mechanical failure, call a professional immediately. Attempting to drain a compromised unit could worsen the problem.
> “While routine flushing is a great DIY task, if your drain valve is completely seized, or you see signs of active leaks, it’s time to call in a professional. Attempting to force things often leads to more extensive and costly repairs.” – Maria Hernandez, HVAC and Plumbing Expert
Maintenance Beyond Draining
Draining and flushing are cornerstones of water heater maintenance, but they’re not the only tasks to keep your system in top shape.
- Inspect and Test the T&P Valve: Annually, gently lift and release the lever on the T&P valve to ensure it’s not seized. This valve is a critical safety device that prevents dangerous pressure buildup.
- Inspect the Anode Rod: The anode rod sacrifices itself to prevent corrosion of the tank lining. It should be inspected every 3-5 years (more frequently in areas with hard water) and replaced when significantly depleted. This is a more advanced DIY task, often best done by a professional.
- Check for Leaks: Periodically inspect the area around your water heater for any signs of leaks, drips, or rust, especially around connections and the base of the tank. Early detection can prevent major water damage.
Conclusion
Regularly draining and flushing your water heater is an essential, yet often neglected, aspect of home maintenance. By committing to this simple task, you actively combat sediment buildup, a primary cause of inefficiency and premature failure. You’ll enjoy the benefits of consistent hot water, reduced energy consumption, and a significantly extended lifespan for your appliance. Remember to prioritize safety above all else, meticulously follow the step-by-step guide for shutting off power, cooling the water, draining sediment, and properly refilling the tank. While most homeowners can confidently tackle this task, don’t hesitate to seek professional assistance if you encounter stubborn issues or feel uncomfortable at any point.
Taking proactive steps to maintain your water heater not only saves you money in the long run but also provides peace of mind, knowing your home’s hot water system is reliable and safe. What other preventive measures do you take to keep your home’s plumbing in excellent condition?
Frequently Asked Questions
How often should I drain my water heater?
Most experts recommend draining and flushing your tank-style water heater annually. If you live in an area with particularly hard water (high mineral content), you might consider doing it every six months to prevent excessive sediment buildup and maintain efficiency.
What happens if I don’t drain my water heater?
Failing to drain your water heater regularly allows sediment to accumulate at the bottom of the tank. This reduces heating efficiency, increases energy consumption, leads to premature wear and tear on components, and can eventually cause leaks or complete system failure, resulting in costly repairs or replacement.
Can I drain a hot water heater by myself?
Yes, draining a hot water heater is a common DIY maintenance task for many homeowners. By following proper safety precautions, gathering the necessary tools, and adhering to a step-by-step guide, you can successfully drain and flush your water heater. However, if you’re unsure or encounter difficulties, it’s best to call a professional.
My water heater won’t drain, what should I do?
If your water heater won’t drain, the most common culprit is a clogged drain valve, usually due to heavy sediment. First, ensure the cold water supply is off and a hot water faucet or the T&P valve is open to prevent a vacuum. You can try briefly turning on the cold water supply to dislodge the clog. If it remains blocked, avoid forcing it and consider calling a professional plumber.
How long does it take to drain a water heater?
The time it takes to drain a Water Heater can vary based on the tank’s size, the amount of sediment, and your home’s water pressure. Typically, a standard 40-50 gallon tank can take anywhere from 20 minutes to an hour to drain completely, especially if you’re flushing multiple times to clear sediment.