Is your water heater secretly costing you money, even when you’re not using hot water? The truth is, without proper insulation, your water heater tank constantly loses heat to its surroundings, forcing it to work harder and consume more energy to maintain a set temperature. This phenomenon, known as standby heat loss, can significantly inflate your utility bills over time. Fortunately, insulating your water heater tank is a straightforward, cost-effective DIY project that can dramatically reduce energy waste and save you a substantial amount of money. This comprehensive guide will walk you through everything you need to know, from understanding the benefits to selecting the right materials and performing a safe, effective installation. By the end, you’ll be equipped to turn your energy-hungry appliance into an efficient hot water powerhouse.
Why Insulate Your Water Heater?
Insulating your water heater tank is one of the smartest home improvement projects you can undertake for immediate and long-term savings. The primary reason is to combat standby heat loss, which occurs as heat escapes through the metal walls of the tank into the cooler air of your home. This constant heat dissipation means your water heater has to cycle on more frequently to reheat the water, leading to unnecessary energy consumption.
Understanding Standby Heat Loss
|
Our Picks for the Best Water Heater in 2026
As an Amazon Associate I earn from qualifying purchases.
|
||
| Num | Product | Action |
|---|---|---|
| 1 | Portable Immersion Water Heater 1800W 120V, Electric Heater for Buckets, Bathtubs and Mini Pools, Submersible Design with Thermostat, Real Time Temperature Display and Dry Burn Protection |

|
| 2 | Portable Water Heater 2000W, Pool Heater - Immersion Heater with Digital Thermometer, Upgraded Magnesium Oxide Heating for Fast Heating, for Small Pools, Bathtubs, Buckets, Tanks |
|
| 3 | Amazon Basics Electric Kettle with Glass Carafe for Tea and Coffee, BPA-Free, Fast Boiling, Auto Shut-Off, 1 Liter, 1500W, Glass and Steel |
|
| 4 | Zojirushi Micom Water Boiler and Warmer (135 oz. / 4L, Silver) |
|
| 5 | Chefman Electric Kettle, 1.8L 1500W, Hot Water Boiler, Removable Lid for Easy Cleaning, Auto Shut Off, Boil-Dry Protection, Stainless Steel Filter, BPA Free, Borosilicate Glass Electric Tea Kettle |
|
| 6 | Amazon Basics Electric Stainless Steel Kettle for Tea and Coffee, BPA-Free, Fast Boiling, Auto Shut-Off, 1.7 Liter, 1500W, Black and Silver |
|
| 7 | Amazon Basics Electric Kettle with Glass Carafe for Tea and Coffee, BPA-Free, Fast Boiling, Auto Shut-Off, 1.7 Liter, 1500W, Black and Silver |
|
| 8 | Cosori Electric Kettle, No Plastic Contact With Water, Wide Mouth For Easy Cleaning, Auto Shut Off, 1.7L Tea Kettle & Hot Water Boiler, Water Heater & Teapot, Borosilicate Glass, Black, 1500W |
|
| 9 | Immersion Water Heater Electric, 2000W Portable Water Heater with 304 S S Guard & LCD Thermometer, Fast Heating Bucket Heater, Ideal for Small Bucket Bathtub, Small Pool, Home Camping Outdoor Use |
|
| 10 | OVENTE Electric Kettle, 1.7L Fast Boiling Water Heater for Coffee or Tea, BPA Free with Water Level Gauge, Auto Shut-Off, Boil-Dry Protection, Indicator Light and Removable Filter, White KP72W |
|
Every tank-style water heater, regardless of its age or efficiency rating, experiences some degree of standby heat loss. Imagine a hot cup of coffee left on a counter; it eventually cools down. A water heater tank is no different. The heat generated to warm your water slowly radiates outwards, especially if the tank’s factory insulation is thin or degraded. Older tanks, in particular, are notorious for having minimal insulation, making them prime candidates for an upgrade. Reducing this loss directly translates to less work for your water heater and, consequently, lower energy bills.
Quantifiable Energy Savings
The energy savings from insulating a water heater can be quite significant, particularly for older models. Homeowners can typically expect to reduce their water heating costs by 5-10% annually with a well-installed insulation blanket. For those with older, less efficient tanks, these savings can even soar to 25-45%. These percentages might seem small individually, but they accumulate into substantial savings over months and years, making the initial investment in an insulation kit pay for itself quickly.
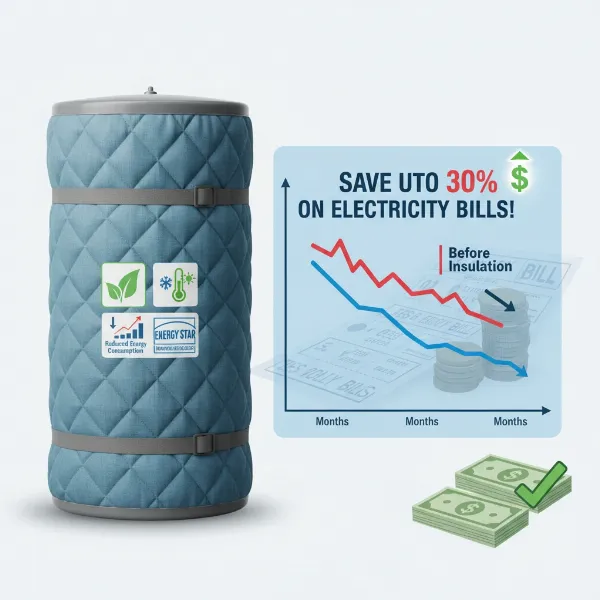 Insulated water heater with electricity bill showing significant energy cost savings
Extended Water Heater Lifespan
Beyond energy savings, insulating your water heater can contribute to its longevity. By reducing the frequency with which the unit needs to cycle on and off to maintain water temperature, you lessen the wear and tear on its internal components. This reduced workload can help extend the overall lifespan of your water heater, delaying the need for costly repairs or premature replacement. It’s a proactive measure that safeguards your investment.
Environmental Impact
Choosing to insulate your water heater also has a positive environmental impact. By consuming less energy, your household reduces its carbon footprint, contributing to a more sustainable planet. This small step helps conserve natural resources and lessens the demand on power grids, promoting a greener lifestyle. Many homeowners are increasingly looking for ways to make their homes more eco-friendly, and water heater insulation offers a simple yet effective solution.
Types of Water Heater Insulation Materials
When it comes to insulating your water heater, you have several material options, each with its own R-value, pros, and cons. The R-value indicates the material’s resistance to heat flow; a higher R-value means better insulating performance.
Insulation Blankets/Jackets
These are the most common and accessible insulation solutions for water heater tanks. They are essentially pre-cut wraps designed to fit around the tank.
- Fiberglass Blankets: Often foil-faced, these are effective and relatively inexpensive. They provide good thermal resistance but require careful handling due to fiberglass particles, which can irritate skin and lungs.
- Foil-faced Bubble Wrap: A more modern option, these blankets consist of reflective foil layers sandwiching air bubbles. They work by reflecting radiant heat and offer a clean, easy-to-install solution, though their R-value might be slightly lower than thick fiberglass.
Rigid Foam Board
While less common for a DIY tank wrap, rigid foam boards (like polystyrene or polyisocyanurate) can be custom-cut and taped around a water heater tank. They offer excellent R-values per inch and a cleaner application than fiberglass. However, the custom cutting and fitting can be more challenging, and ensuring a tight seal is crucial for effectiveness. This method is often preferred for basement walls or custom enclosures rather than directly on the tank itself.
Spray Foam
Spray foam insulation is generally not recommended for DIY water heater tank insulation. It requires specialized equipment and expertise to apply correctly. While it offers superior R-values and a perfect seal, it can be difficult to remove if maintenance is needed and carries potential fire risks if not applied properly around heat sources, especially with gas water heaters. It’s best left to professionals for other applications.
Choosing the Right R-Value
The ideal R-value for your water heater insulation depends on your climate, the existing insulation of your tank, and local energy codes. For most applications, an additional R-8 to R-11 can provide significant savings. Older tanks with an R-value of less than 12 benefit most from extra insulation. If your tank already has an R-value of R-24 or higher, additional insulation may not provide substantial savings. Always check your water heater’s manual or label for its existing R-value.
| Feature | Fiberglass Blanket | Foil-faced Bubble Wrap |
|---|---|---|
| R-Value Range | R-5 to R-10 (varies by thickness) | R-3 to R-6 (often used with air gap for better performance) |
| Pros | Cost-effective, good thermal resistance | Clean, easy to install, reflective properties |
| Cons | Can be irritating to skin/lungs, bulky | Lower R-value than thick fiberglass, less durable |
| Best For | Older, poorly insulated tanks | Newer tanks needing a boost, easy DIY |
Step-by-Step Guide: Insulating Your Electric Water Heater
Insulating an electric water heater is a relatively straightforward DIY task. Always prioritize safety by following these steps carefully.
Safety First: Turning Off Power
Before you touch anything on your water heater, you must turn off its power supply. Locate your home’s main electrical panel and switch off the circuit breaker labeled for the water heater. If it’s not clearly labeled, turn off the main breaker to your entire house. Confirm the power is off by trying to adjust the thermostat or checking for any indicator lights. This crucial step prevents electric shock hazards during the installation process.
Measurements and Cutting
With the power off, measure the height and circumference of your water heater tank. Most insulation blankets come in standard sizes, but you may need to trim it for a perfect fit. Lay the insulation blanket flat and mark your measurements. Use a sharp utility knife or heavy-duty scissors to carefully cut the blanket to size. Remember to leave openings for the thermostat access panels, pressure relief valve, cold water inlet, hot water outlet, and drain valve.
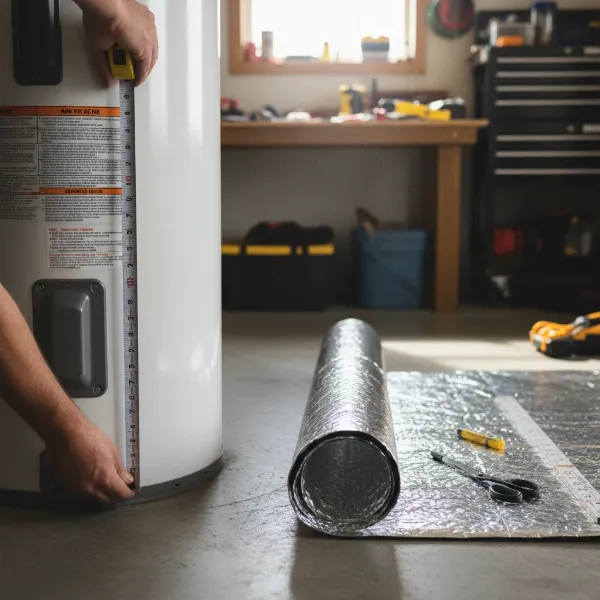 Person measuring water heater blanket before cutting to fit tank perfectly
Wrapping and Securing
Begin wrapping the insulation blanket around the tank, starting from the back and working your way forward. Ensure it fits snugly and evenly around the entire circumference. Once wrapped, secure the blanket with heavy-duty foil tape or strapping that often comes with the insulation kit. Apply tape liberally along all seams and edges to create a tight seal and prevent the blanket from shifting or unraveling over time. This ensures maximum heat retention.
Cutting Openings for Pipes and Controls
Carefully identify the locations of the cold water inlet pipe, hot water outlet pipe, temperature and pressure relief (T&P) valve, thermostat access panels, and the drain valve. Using your utility knife, cut precise openings in the insulation blanket for each of these components. It’s vital that the T&P valve and its discharge pipe are never covered, as this is a critical safety device. Ensure all cut edges are neatly taped to prevent fraying and maintain the blanket’s integrity.
Final Inspection
Once the insulation is fully wrapped and secured with all necessary openings cut, perform a thorough final inspection. Check that all seams are taped, the blanket is snug, and no vital components (especially the T&P valve) are obstructed. Ensure there’s no insulation interfering with electrical connections. Once satisfied, you can turn the power back on at your circuit breaker. You should immediately start experiencing the benefits of reduced heat loss.
“Many people overlook water heater insulation, but it’s often one of the quickest and most impactful ways to reduce energy consumption in a home. The returns on investment are usually very fast.” – Sarah Chen, Certified Energy Auditor
Special Considerations for Gas Water Heaters
Insulating a gas water heater requires extra caution due to the presence of combustion gases and ventilation requirements. While the general steps are similar, specific safety measures must be strictly adhered to.
Critical Venting and Airflow
Unlike electric models, gas water heaters rely on a flue pipe to vent exhaust gases, and they also require fresh air for combustion. Never cover the top, bottom, or any vents of a gas water heater with insulation. The draft hood and flue pipe must remain completely clear to allow proper exhaust flow. Blocking these can lead to a buildup of dangerous carbon monoxide gas, posing a severe health risk.
Clearance Around Burners and Controls
Maintain a minimum clearance of at least two inches from the burner and combustion air intake on the bottom of the tank. Do not allow the insulation blanket to sag or touch any hot surfaces like the draft hood or flue pipe. Ensure that the thermostat, pilot light access, and any gas lines are easily accessible and unobstructed. If in doubt, consult a professional or refer to your water heater’s manual for specific clearance requirements.
When NOT to Insulate Your Water Heater Tank
While insulating a water heater is often beneficial, there are specific situations where it’s either unnecessary or even detrimental. Knowing when to avoid insulation is just as important as knowing how to do it.
Newer, High-Efficiency Tanks
Many modern water heaters, especially those manufactured in the last few decades, come with significantly improved factory insulation. If your water heater has an R-value of R-24 or higher, adding an external insulation blanket may yield minimal additional savings and might not be worth the effort or cost. Check the energy guide label or your owner’s manual for the tank’s R-value. If it’s already high, you’re likely already enjoying efficient operation.
Manufacturer Recommendations
Always consult your water heater’s owner’s manual before adding external insulation. Some manufacturers explicitly advise against adding insulation blankets, particularly for certain gas models or if it could void the warranty. Adhering to manufacturer guidelines is crucial for safety and ensuring your appliance operates as intended. Disregarding these recommendations could lead to operational issues or, in the worst case, dangerous situations.
Maintenance Tips for Your Insulated Water Heater
Even after insulating, a bit of ongoing maintenance can ensure your water heater operates efficiently and safely for years to come.
Regular Checks
Periodically inspect the insulation blanket for any signs of wear and tear, such as rips, tears, or sagging. If the insulation gets wet, it can lose its effectiveness and potentially promote corrosion on the tank. Ensure all taped seams are still secure and that the blanket isn’t interfering with any valves or pipes. A quick visual check every few months is usually sufficient.
Keeping it Clean and Dry
It’s important to keep the insulation dry. If you notice any leaks from your water heater, address them immediately. A damp insulation blanket not only loses its thermal resistance but can also create an environment conducive to mold growth and can accelerate rust on the tank’s exterior. Clean any dust or debris that accumulates on the blanket to maintain its efficiency.
Conclusion
Insulating your water heater tank is a smart, impactful investment for any homeowner looking to cut down on energy costs and enhance household efficiency. By taking this simple step, you effectively minimize standby heat loss, leading to noticeable reductions in your monthly utility bills and extending the life of your appliance. Remember to prioritize safety, especially with gas models, and choose the right insulation material for your specific needs. This small DIY project yields significant returns, contributing to both your wallet and the environment. Have you checked your water heater’s insulation recently?
Frequently Asked Questions
How much money can I really save by insulating my water heater?
You can typically save 5-10% on your water heating costs annually. For older, poorly insulated tanks, savings can be even higher, sometimes up to 25-45%, which quickly offsets the cost of the insulation kit.
How often should I replace the water heater insulation?
If properly installed and maintained, a water heater insulation blanket can last for the entire lifespan of your water heater, often 10-15 years. Replace it if it becomes damaged, wet, or significantly worn.
Can I insulate my tankless water heater?
Tankless water heaters do not have a storage tank, so insulating them in the traditional sense is unnecessary. However, insulating the hot water pipes leading from a tankless unit can further improve efficiency.
Is it safe to insulate an old water heater?
Yes, it is generally safe and often highly recommended to insulate older Water Heaters, as they typically have very poor factory insulation. Just ensure you follow all safety guidelines, especially regarding gas vents and controls.
What is the best R-value for water heater insulation?
For most homes, adding an R-8 to R-11 insulation blanket is sufficient to significantly reduce heat loss. If your existing tank insulation is already high (R-24 or more), additional insulation may not be necessary.